
I’m going to be talking about a game-changing piece of software. in which we discus How to Create a Multiboot USB Flash Drive || All OS in single USB. I was talking about four different bootable USB drives that everyone should make. They can act as rescue drives in case your computer doesn’t boot or something like that and you have to fix it. I mentioned that you would need four different USB drives, one for each of the disks. However, in the comments, a lot of you told me about a program called Ventoy, which basically allows you to really easily create a multi bootable USB stick, where it allows you to boot from any ISOs or bootable images you put into it.
It’s really easy. You literally drag and drop the ISOs into it and then it allows you to put from them. It’s even open source, so that adds another level of credibility and trust to it. I’m going to show you how it works and how to set it up and why I think it’s so cool. Make sure you follow along, because there are a couple of steps that might be confusing, specifically around the secure boot feature that a lot of computers have. You have to specially set up this USB boot disk if you want that to work with your computer.
So make sure you follow the steps. But it’s really not that hard. To get started, you’re just going to need one USB drive, the bigger, the better, though because that way you can store more bootable ISOs on it. I would recommend probably about 64 gigabytes or more. By the way, USB drives are dirt cheap these days. The one I got and I would recommend is probably the Sandisk drive. You can get it on Amazon these days for literally $12 for a 64 gigabyte one. It’s a good one, too, like 3.1 USB. It’s really good speeds. Some testing I’ve seen shows it has really good durability and write speeds and stuff like that.
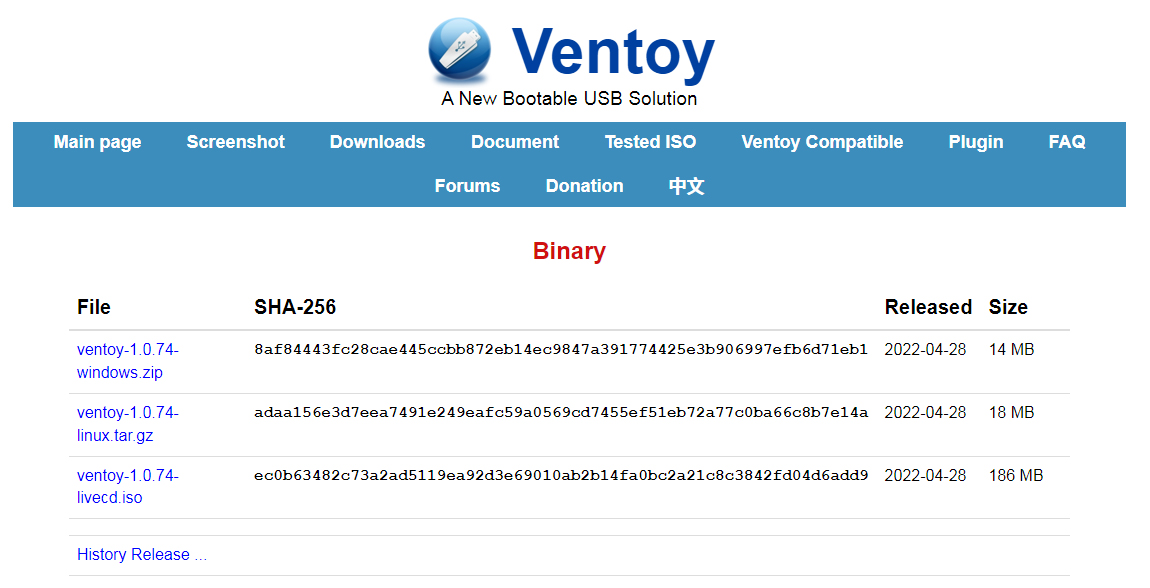
Once you pick out a thumb drive, make sure it’s empty and you’re not using it for anything else, because it will be wiped. You just download the installer for Ventoy, either from their website, Ventoy.net, or the get hub releases page for the project.

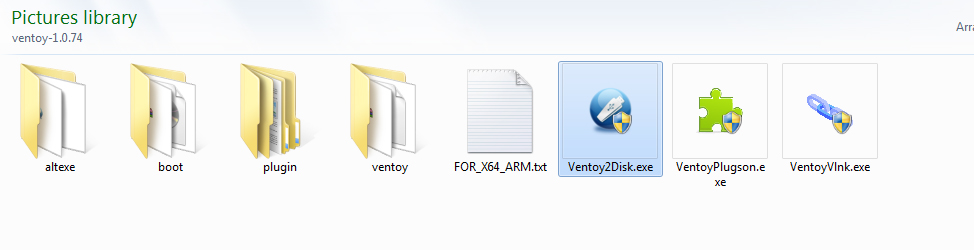
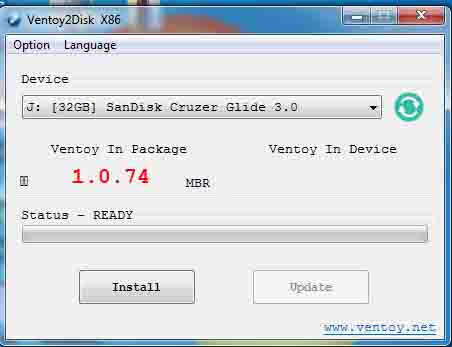
Then once it’s downloaded, you simply run the Ventoy2Disk.exe set-up file. When you run it, you’ll see this.
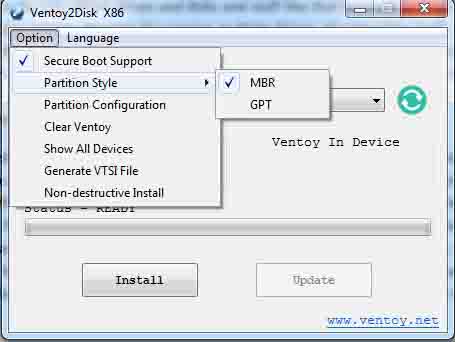
Just make sure you double check the drive letter and the device you’re selecting, because anything you do select will be completely wiped, so remember that. Here’s a really important thing not to forget, though, is go up to options and then click secure boot support. Now, when you click the dropdown, it’ll show it as checked. Also, next to the version name of Ventoy, lower in the window, it’ll show that little lock to show that it’s been enabled.
The reason this is important is because most computers have what is called secure boot. It’s a feature in the BIOS that basically only allows drives and disks and stuff like that to run if it’s been signed in a certain way. Ventoy, I guess, because it’s running multiple things, it’s signed by itself. So you have to manually tell the BIOS to allow this to be run. Or you would have to just disable secure boot altogether in the BIOS, which is probably not recommended, but you just have to do a couple more steps. It’s actually easy. I’ll show you how to do it later, but just be aware that if you don’t check secure boot support and you try to run it, it’ll just not run.
For the partition style, just keep it as MBR, Master Boot Record. If your computer doesn’t like it for some reason, you can always change it to GPT later. Then you just click install. It’s going to format the drive, wipe everything on it and create a couple different partitions. One is going to be the boot partition that the BIOS are going to use to boot off.
That’s going to be hidden. Then there’s going to be the bigger data partition where you’re going to copy the ISOs onto it. When it’s done, you’ll see the Ventoy name for the USB. Now, that’s the big partition you’re going to use. By the way, you can also rename that. It doesn’t have to be called Ventoy. Also, once it’s done, you’ll now see that on the right-hand side it’ll show what version of Ventoy is on the USB drive as well as the little lock to show that the support for security was added. Oh, and if you want to update with a more recent version of Ventoy, literally all you have to do is run the program again with the newer one and click update. Then it’ll overwrite the old program, but actually keep everything in the data partition.
So it’s not like you have to recopy everything over it. Then once you install it, you literally just have to copy the image or ISO files, whatever, into that disk and those will show up as bootable when you boot to the Ventoy disk on your computer. You just select from whatever ones. It also supports several other types, such as image files, IMG, WIM, that’s Windows image or something like that. And even virtual hard drive files, VHD. It supports a lot. It’s really easy. Just copy it over.
And to boot it, literally, just when you’re booting up the computer, you have to get to however your computer lets you select the bootable device. Sometimes there’s just a key you have to keep pressing. Or at least there’s almost always a way to do it from the BIOS. Just look up how to get to the BIOS from your specific computer model. Then you can usually boot to whatever device you want. Also, if you see two partitions listed, I believe the second one is the one you have to select. If it doesn’t, you can just try it. But in my case, the second one is the one and you have to choose.
Now, like I mentioned, secure boot is probably going to be enabled on your computer. It’s not a problem. It just means the first time you boot to Ventoy on that computer, you have to basically add a key to it so the computer will allow it. The first time you do boot to the Ventoy USB, you’ll probably see a blue window come up that looks like this. It might say access denied or an error or something. This is okay. It’s really easy to fix. However, if you try to boot to the USB and nothing happens, or the computer just restarts, that might mean you forgot to enable secure boot support.
This is what you’ll see in the Ventoy boot screen. You’ll see literally a list of the image or ISO files that you copied in before. There are a couple options such as memdisk mode, which loads the whole ISO into memory or something before booting. If you have some issues, that might be something to try. Also, if you want, you could organize the ISOs into different folders. In that case, if you select tree mode, that’ll basically let you see the different directory structure and show the folders, not just all of them listed at once. The option for local boot, just boots to the regular hard drive. Then the tools option is stuff like keyboard layout, screen display mode, some plugins you may have added, stuff like that.
To boot to any of these images, you literally just highlight it and select it. And that’s it. It’ll boot to it just like as if you had put it on its own USB drive. So it’s dead simple. There’s not much to it, but just super useful. And cool. Now, one thing I’ll point out is you might think the menu looks kind of ugly, but it does support themes. Ventoy uses the GRUB boot loader, which is also used by a lot of Linux distributions. There are many themes out there for that, so it does support those. There is one website, gnome-look.org, and they have a page for GRUB themes.
On the right hand side, you can literally see a list of the most popular ones that probably look the best. Actually, the top one called BigSur GRUB theme makes it even easier, because they have a pre-made Ventoy version, so you just download the Ventoy version from the site. It is a TAR file, so you’ll need like 7-Zip or WinRAR to open it. But then you literally just copy the Ventoy folder into the main directory of the USB drive, along with all the other ISOs. Now, when you boot up the USB, it’ll look a lot prettier.
I also threw in the Windows 10 installation media, because that could come in handy, along with Hiren Boot CD, which I mentioned several times. Basically, it’s a bootable disk that has a ton of tools in there that can be used for everything from disk recovery to fixing stuff when Windows won’t boot. It does look like Windows, because it runs on a lightweight version, Windows PE. So really cool one. Useful to have. So not much more to it. It’s just a really useful program. Simple to set up. If you guys do want to keep watching, the next one I would recommend at this point is that one where I talk about four different bootable USB drives everyone should make.


Nice post. I was checking continuously this weblog and I am impressed!
Extremely useful information specifically the last part
🙂 I handle such information a lot. I used to be seeking this certain information for a very lengthy time.
Thank you and good luck.
What’s Taking place i am new to this, I stumbled upon this I’ve found It positively helpful and it has
helped me out loads. I hope to give a contribution & help different users like its helped me.
Great job.
The Center for Cold-Formed Material Constructions (CCFSS) was established at the
College of Missouri-Rolla (now Missouri University of Science and Technology) in May 1990 under an initial grant received from the Usa Metal and Metal Start.
Over the years, the Center’s sponsorship possesses harvested to include:
Cold-Formed Metallic Engineers Initiate, Steel Design Association, Rack Companies Institute,
Simpson Strong-Tie, Material Porch Institute and Metal Framing Market Organization. In 2000,
the Middle has been renamed for its Founding Director, Dr. Wei-Wen Yu.
The Center is dedicated to furthering the field of cold-formed steel and hosts continuing
education events such as the Wei-Wen Yu Essential Custom made Discussion on Cold-Formed Material Structures, which has taken place every other year since 1971.
Top rated research workers, technical engineers, companies and educators who have involved in research, design, make and the
work with of cold-formed metallic customers get at this
convention to found outlined talks of their recent findings.
very good
good
don’t think anything
interesting for a very long time
Thanks for the post
Cool, I’ve been looking for this one for a long time
very good
_________________
Hello.
Bel article, je l’ai partagé avec mes amis.
I was recommended this website by my cousin. I’m not sure whether this post
is written by him as no one else know such detailed about my problem.
You are wonderful! Thanks!
AI-Powered Technologies: Benefits and Challenges
Honest Reviews of Products You Can Trust
interesting post
Nicely put, Thanks a lot.
Thanks for the post
Howdy! I could have sworn I’ve been to this web site before but after looking at many of the posts I realized it’s new to me.
Regardless, I’m certainly delighted I stumbled upon it and I’ll be bookmarking it and checking
back regularly!
Appreciating the commitment you put into your blog and in depth information you offer.
It’s great to come across a blog every once in a while that isn’t the same old rehashed material.
Great read! I’ve saved your site and I’m including your
RSS feeds to my Google account.
Great post. I used to be checking continuously this weblog and I’m impressed!
Very helpful info particularly the remaining section :
) I take care of such information a lot. I was seeking this particular information for a long time.
Thanks and good luck.
You are so interesting! I don’t believe I’ve truly read through a single thing like this before.
So nice to find someone with some original thoughts on this issue.
Really.. thank you for starting this up. This website is one thing
that is required on the web, someone with some originality!
I must thank you for the efforts you have put in writing
this site. I am hoping to check out the same high-grade content from you in the future as well.
In fact, your creative writing abilities has encouraged me to get my very own website now 😉
I blog often and I really appreciate your content. This great
article has really peaked my interest. I am
going to bookmark your blog and keep checking for new details about once per week.
I subscribed to your RSS feed as well.
Helpful posts. Thanks a lot!
Thanks, I’ve been looking for this for a long time
Hello.
yes
Hello.
yes